Master the Lat Pulldown Machine with this ultimate guide! Learn perfect form, common mistakes, and powerful variations to build a strong, wide back and achieve max gains.
Ever walked into the gym, looked at that imposing machine with the long bar and the stack of weights, and wondered if you’re truly getting the most out of it? You’re not alone. The Lat Pulldown Machine is a staple in nearly every gym across the globe, a powerhouse for building a strong, wide back. But like any effective tool, knowing how to use it right is the difference between mediocre effort and maximum gains.
If you’re aiming for that coveted V-taper, improved posture, or simply stronger pulling power, mastering the lat pulldown is non-negotiable. This isn’t just about moving weight; it’s about connecting with your muscles, refining your form, and unlocking your full back-building potential.
Let’s dive deep into everything you need to know to truly own the lat pulldown machine.
Why Your Lats Matter (Beyond Just Looking Good)
Before we get into the “how,” let’s quickly cover the “why.” Your latissimus dorsi, or “lats,” are the largest muscles in your upper body. They start under your armpits, fan out across your back, and connect down to your lower spine and pelvis.
Beyond giving you a broader, more athletic physique, strong lats are crucial for:
-
Posture: They help pull your shoulders back and down, counteracting the hunched-over posture many of us develop from sitting at desks.
-
Shoulder Health: Strong lats contribute to overall shoulder stability and can help prevent injuries.
-
Pulling Strength: Essential for everything from climbing and rowing to everyday tasks like pulling open heavy doors.
-
Sport Performance: Many athletes, from swimmers to climbers, rely heavily on powerful lats.
The lat pulldown machine is arguably one of the most effective ways to isolate and strengthen these vital muscles.
Decoding the Lat Pulldown Machine: Anatomy of the Beast
The lat pulldown machine is relatively simple, but understanding its components can help you use it more effectively:
-
The Seat: This is where you sit! Crucial for stability.
-
Thigh Pads/Rollers: These lock your lower body in place, preventing you from lifting off the seat as you pull.
-
The Cable System: This is what connects the bar to the weight stack.
-
The Weight Stack: Where you select your resistance.
-
The Bar: This is what you grip. It’s usually interchangeable, allowing for different grip variations.
Mastering the Mechanics: The Perfect Lat Pulldown
Many people treat the lat pulldown like a bicep curl or an ego lift, heaving the weight down with their arms and body English. To truly hit your lats, you need to be precise.
Here’s your step-by-step guide to perfect form:
-
The Setup:
-
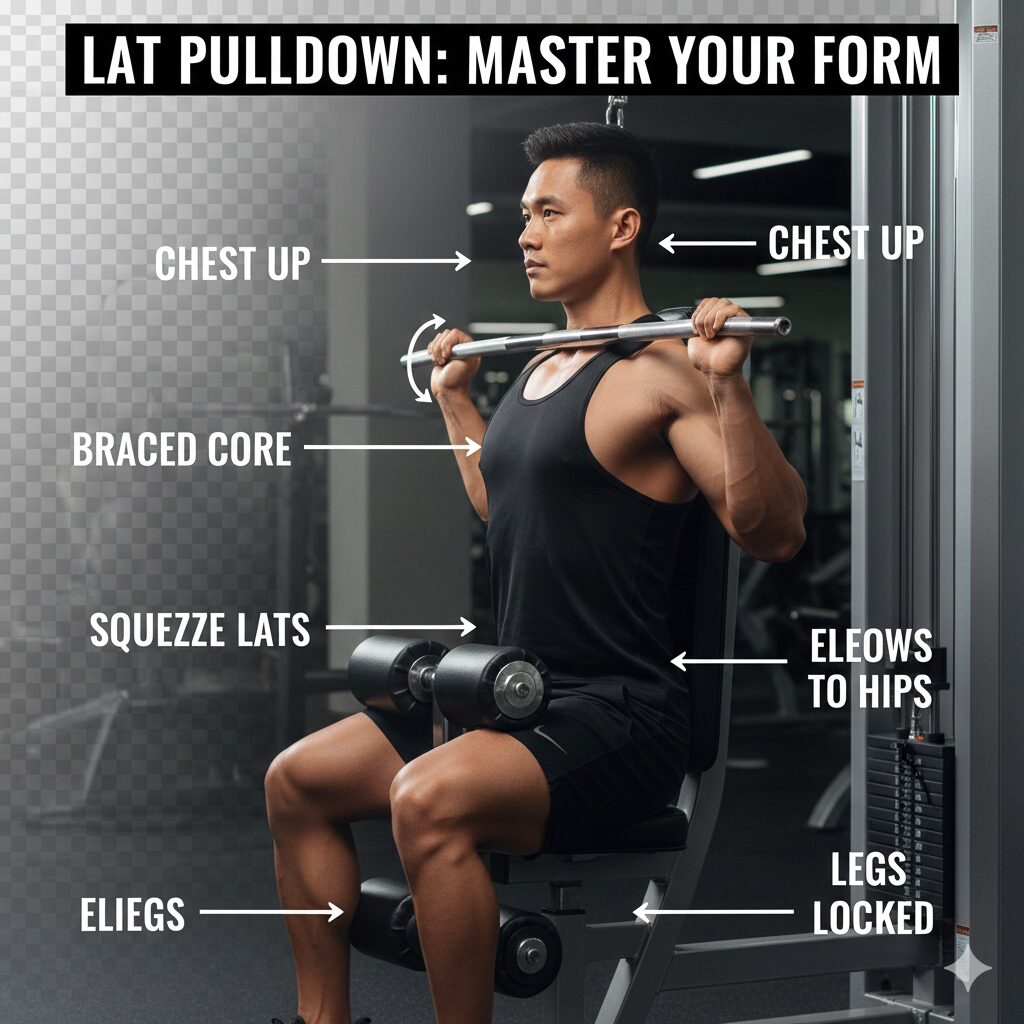
Adjust the Thigh Pads: Sit on the bench and adjust the thigh pads so your legs are snug and you feel locked into place. This is critical for preventing your body from lifting during the pull. Your feet should be flat on the floor or on the foot supports.
-
Choose Your Grip: For beginners, a wide overhand grip is a great starting point. Your hands should be outside shoulder-width. Experiment with different attachments (more on this later!).
-
Reach Up: With your chest up and shoulders slightly back, reach up and grab the bar. Ensure your grip is firm but not death-like; you don’t want to prematurely fatigue your forearms.
-
-
The Pull (The Concentric Phase):
-
Lean Back Slightly: Initiate the movement by leaning back just a few degrees (around 10-20 degrees). This slight lean allows for a better line of pull for your lats.
-
“Pull with Your Elbows”: This is the golden cue. Instead of thinking about pulling the bar down with your hands, imagine driving your elbows down towards your hips. Your hands are just hooks.
-
Squeeze Your Lats: As the bar comes down, focus on squeezing your lats together. The bar should come down to about your upper chest or clavicle level.
-
Keep Your Chest Up: Don’t let your chest collapse or your shoulders round forward. Maintain an upright, proud posture throughout.
-
Shoulder Blades: Think about retracting (pulling back) and depressing (pulling down) your shoulder blades.
-
-
The Release (The Eccentric Phase):
-
Controlled Ascent: Slowly allow the bar to return to the starting position. Don’t let the weight just fly up. Resist the pull of the cable.
-
Full Stretch: Allow your lats to get a full stretch at the top of the movement. You should feel your shoulder blades elevate slightly.
-
Maintain Tension: Keep your core engaged and your body stable throughout the entire range of motion.
-
Common Mistakes to Avoid (and How to Fix Them)
Even seasoned gym-goers fall prey to these pitfalls. Be vigilant!
1. “The Rocking Horse” (Excessive Body English)
-
Mistake: You’re using your entire body to swing the weight down, turning it into more of a full-body heave than a targeted lat exercise.
-
Fix: Reduce the weight. Seriously. Lock your lower body in firmly with the thigh pads. Focus on isolating the movement to your back muscles. If you can’t control the weight, it’s too heavy.
2. Pulling Behind the Head
-
Mistake: This is an old-school technique that can place excessive stress on your shoulder joints and cervical spine.
-
Fix: Always pull the bar to the front, aiming for your upper chest/clavicle. This is safer and more effective for targeting the lats.
3. Using Your Arms Too Much (Bicep-Dominant Pull)
-
Mistake: You feel it mostly in your biceps and forearms, not your back.
-
Fix: Implement the “pull with your elbows” cue. Think of your hands as simply hooks holding the bar. Try wrapping your thumbs under the bar rather than around it (false grip) to reduce bicep activation and increase lat engagement.
4. Rounded Back/Hunched Posture
-
Mistake: Your back rounds, and your shoulders roll forward, especially at the bottom of the pull.
-
Fix: Keep your chest proud and slightly arched. Imagine trying to touch your chest to the bar. Engage your core to maintain a stable spine.
5. No Full Stretch at the Top
-
Mistake: You cut the movement short, never fully extending your arms and allowing your lats to stretch.
-
Fix: Control the eccentric phase. Let the bar go all the way up until your arms are fully extended and you feel a good stretch in your lats and outer back. This full range of motion is crucial for muscle development.
Beyond the Basic: Lat Pulldown Variations
Once you’ve nailed the standard wide-grip overhand pulldown, experiment with these variations to hit your lats from different angles and challenge your muscles in new ways:
-
Close-Grip Underhand Pulldown:
-
Attachment: Use a V-bar or a close-grip handle.
-
Focus: Emphasizes the lower lats and biceps. You’ll likely be able to lift more weight here.
-
-
Neutral Grip Pulldown:
-
Attachment: Use a V-bar or parallel grip handle.
-
Focus: A more natural and shoulder-friendly grip. Hits the lats broadly.
-
-
Reverse-Grip (Underhand) Wide Pulldown:
-
Attachment: Wide bar, underhand grip (palms facing you).
-
Focus: Another great way to emphasize lower lats and increase bicep involvement.
-
-
Single-Arm Lat Pulldown:
-
Attachment: Single D-handle.
-
Focus: Excellent for identifying and correcting muscle imbalances. Allows for a deeper stretch and more intense contraction on each side.
-
Programming the Lat Pulldown for Max Gains
The lat pulldown can be incorporated into your routine in several ways, depending on your goals:
-
For Strength: 3-4 sets of 6-8 repetitions with heavy weight, focusing on perfect form.
-
For Hypertrophy (Muscle Growth): 3-4 sets of 8-12 repetitions with moderate weight, emphasizing the eccentric (lowering) phase.
-
For Endurance: 2-3 sets of 12-15+ repetitions with lighter weight.
Placement in Your Workout:
-
As a primary back exercise after heavy compound movements like rows, or as a standalone focus.
-
As a finisher to pump blood into the lats after a broader back workout.
Conclusion: Build a Back You Can Be Proud Of
The lat pulldown machine is far more than just a piece of equipment; it’s a gateway to building a powerful, well-defined back that supports good posture, boosts functional strength, and enhances your overall physique.
By understanding the mechanics, correcting common errors, and exploring different variations, you can transform your lat pulldown technique from a casual pull into a highly effective muscle-building movement. Remember, consistency and proper form are your greatest allies. So, go ahead, adjust those thigh pads, grab that bar, and start pulling your way to max gains!
Read More
Master the Single-Leg RDL: The Secret to Unshakeable Balance and Bulletproof Glutes (2026)
Frequently Asked Questions (FAQ)
1. What’s the best grip for lat pulldowns?
There isn’t a single “best” grip, as different grips emphasize different parts of your back and arms. A wide overhand grip is generally recommended for targeting the outer lats for width. A close-grip underhand (reverse) grip tends to hit the lower lats and involves more biceps. Experiment to find what feels best and gives you the strongest lat contraction.
2. Should I pull the bar in front or behind my head?
Always pull the bar in front of your head to your upper chest or clavicle. Pulling behind the head can put excessive strain on your shoulder joints and cervical spine, leading to potential injury. It’s an outdated and less effective technique.
3. Why do I feel my biceps more than my lats?
This is a common issue! It usually means you’re using too much arm strength. Focus on the cue “pull with your elbows” rather than your hands. Try to initiate the movement by depressing your shoulder blades and squeezing your lats. Using a thumbless grip (false grip) can also help reduce bicep involvement.
4. How much should I lean back during a lat pulldown?
A slight lean of 10-20 degrees from vertical is generally appropriate. This puts your lats in a better line of pull. Excessive leaning turns the exercise into more of a seated row, while staying perfectly upright can sometimes limit your lat engagement. Find the sweet spot where you feel your lats working hardest.
5. Can I do lat pulldowns if I have shoulder pain?
If you have current shoulder pain, it’s always best to consult with a doctor or physical therapist before performing any exercise. However, the lat pulldown can often be a safer alternative to pull-ups for individuals with shoulder issues because you can control the load and range of motion more easily. A neutral grip (palms facing each other) is often the most shoulder-friendly option. Start with light weight and focus on perfect, controlled form.